07/05/2015
Blog technique
Automated Reverse Engineering of Cryptographic Algorithms
Pierre Lestringant

In this article we present a practical case of automated reverse engineering of cryptographic algorithms. We first briefly recall how does our automated solution work. Then we explain step by step how it can be used in a practical case to identify and locate an AES implementation. Finally, we show how the localization results can be exploited by security experts to easily check the correctness of the cryptographic implementation.
Data Flow Graph Isomorphism to Identify Cryptographic Algorithms
When assessing software security, analysts must pay special attention to cryptographic code. In fact, a poorly chosen algorithm or a faulty implementation can jeopardize sensitive data. Since binary analysis is a difficult and cumbersome task it seems interesting to assist the security expert with an automated method to retrieve cryptographic algorithms from executables files.
In a recent publication, we proposed a new solution to automatically identify and locate cryptographic algorithms inside binary software. This solution is focused on symmetric cryptography and, for now, our implementation only deals with x86 executable files that can be run in a Dynamic Binary Instrumentation (DBI) environment.
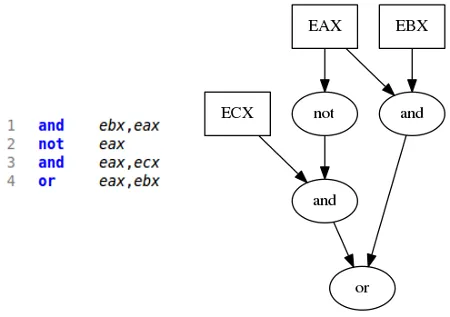
This solution is based on Data Flow Graph (DFG) isomorphism. A DFG is a directed graph representing the data dependencies inside a set of operations. Basically a vertex corresponds to an operation and there is an edge from vertex v to vertex u, if the result produced by operation v is an input operand for operation u. As an example, an assembly snippet and its DFG counterpart are given on the figure below. Notice that eax, ebx and ecx are input variables, thus they are drawn in rectangle shaped nodes.
Thanks to that representation, it is easy to extract groups of related instructions and use them, if they are distinctive enough, as signatures for algorithms recognition. More formally, signatures are distinctive connected subgraphs that are contained in the DFG of every implementation of a given algorithm. To be effective, signatures should cover as much of the algorithm implementation as possible. For instance, if one is interested by the input / output parameters, the signature must contains vertices corresponding to those parameters in order to locate them inside the DFG. Searching signatures inside DFGs is equivalent to a well known NP problem called subgraph isomorphism. However according to our observation, it can be solved efficiently in every case encountered in our context.
Ideally we would like to have a single signature per algorithm. This signature should be able to match every possible implementation of an algorithm. However, from a DFG perspective, there can be a gaping distance between two implementations of a same algorithm. It can be caused by small variations in source code and/or different compilation conditions. For instance, if the register allocation or the instruction selection (which are highly dependent on the optimization level, the compiler and the source code) are done differently it could hamper signatures detection. Thus, in order to build a more robust solution, we add a normalization phase. The goal of the normalization phase is to remove the variations that exist between several implementations of a same algorithm by rewriting their DFG. As illustrated by its many uses in the compiler field for code optimizations, DFG is convenient representation for code rewriting.
The following figure is an overview of the described solution, where these three main steps are represented.

We have conducted exhaustive tests on synthetic samples including numerous compilation conditions on different source codes. These experiments were carried out for several well known symmetric cryptographic algorithms: AES, MD5, XTEA, RC4 and SHA1. It appeared that our solution was able to correctly detect the underling algorithm in the vast majority of cases.
A Practical Example: 7-Zip
7-Zip is a well known and widely used compression tool for Windows. In our context, we get interested by the 7-Zip software because it allows users to encrypt the compressed data. Here below, we’ll show how we can identify and locate the cryptographic algorithm used for encryption using our automated method.

Collecting an Execution Trace
Despite the fact that most of our method is static (DFG creation, normalization and isomorphism), we still need to collect an execution trace. In fact, to simplify the code rewriting operations used during the normalization phase we made the straight-line code hypothesis. According to that hypothesis, instructions are always executed in the same order from the first instruction to the last. From the CFG perspective the whole code is contained in a single basic block. In practice, it is easy to meet this requirement by monitoring a given execution and by recording every executed instructions. To that extend we created a pintool (that relies on the PIN DBI framework) called lightTracer_pin.dll to collect the execution trace.
The following line compresses and encrypts a single file using 7-Zip command line interface.
					$ ./pin.exe -t lightTracer_pin.dll -- ./7z.exe a archive.7z test.txt -p123password

7-Zip 9.20  Copyright (c) 1999-2010 Igor Pavlov  2010-11-18
Scanning

Creating archive archive.7z

Compressing  test.txt

Everything is Ok
It’s important to note that collecting a single execution trace is enough. Indeed, algorithms used for symmetric cryptography do not contain conditional instruction depending on input data. Thus, the execution trace of the cryptographic algorithm remains the same across every possible execution.
Identifying Useful Code Fragments
Since our automated method involves computationally intensive tasks (related to normalization and subgraph isomorphism), we cannot run it on the whole execution trace. Thus, we have to restrain our analysis to code fragments of a few thousand dynamic instructions. The best way to select interesting fragments from a cryptographic point of view is to search for constants. A nice tool to automatically identify cryptographic constants is FindCrypt2, but in the case of 7z.dll, it did not find any constant related to block ciphers. However a manual search revealed the AES SBox (unfortunately this particular constant is not covered by FindCrypt2).
Using IDA, we found that the AES SBox is used in a function starting at address 0x100998b0. Searching in the execution trace we found that this address is hit one time after 1755928372 dynamic instructions (remind this value for the next step). We will consider these number of instructions as the offset corresponding to the starting point of our analysis.
Automatically Identifying the Encryption Algorithm
In order to automatically identify the encryption algorithm that 7-Zip uses, we have to look for algorithm signatures within the execution trace. The simplest assumption is to say that the function accessing the AES SBox corresponds to the encryption routine. From our experience we know that the length of a typical AES implementation does not exceed 1000 dynamic instructions. Thus, we create a trace fragment from offset 1755928372 to offset 1755929372 (mind the previous offset corresponding to our starting point). Then, we ask our tool to create the corresponding DFG, normalize it, and finally search for signatures.
					> export trace [1755928372:1755929372]
> create dfg
> normalize dfg
> search signature
NO SIGNATURE FOUND
We can see here that no signature were found in that code fragment… Assuming a table implementation of AES, this is not utterly surprising. Indeed the table implementation of AES does not directly use the AES SBox but uses instead 4 lookup tables (the ShiftRows and the MixColumns are combined with the SubBytes resulting in 4 lookup tables of 1 kilobyte each). Since these tables have not been revealed by FindCrypt2, we can guess they are dynamically computed. Considering that, it is possible that the function accessing the AES SBox is only an initialization function in charge of computing the large lookup tables. It would explain why we did not find any AES signatures.
As a second guess we choose to increase the size of the trace fragment from 1000 dynamic instructions to 3000. With a larger code fragment we expect to reach the encryption function that, according to our reasoning, may be executed after some sort of initialization procedure.
					> export trace [1755928372:1755931372]
> create dfg
> normalize dfg
> search signature
SIGNATURE NAME                   | NB OCCURRENCE
-------------------------------- | -------------
AES_13_round                     | 1
[...]
We can see here that a signature called AES_13_round has been detected. This signature targets the table implementation of AES and covers 13 consecutive rounds. For AES the number of round depends on the size of the key. 13 rounds correspond to a 256-bit key if we omit the last round (which differs from the others and, for simplicity, has not been included in this signature). To sum up, we have just identified that 7-Zip uses a table implementation of AES256 to encrypt the user data.
At this point we have successfully identified the encryption algorithm, its implementation and the size of the key. What we want to do now is to check if the provided implementation is correct, and especially if it is compliant to the NIST specification. To this end, we will demonstrate in the next section how the location information provided by this method can be exploited to run NIST test vectors.
Running Test Vectors
The AES_13_round signature has 2 input parameters: the plaintext (divided into four fragments of 32 bits each) and the round key buffer; and one output parameter: the ciphertext (divided into four fragments of 32 bits each). Each parameter’s fragment is located using the address of the instruction producing it. In the example below, the first fragment of the plaintext is produced by the instruction at address 0x10099a7e.
					> search signature
[...]
INPUT  0 = {0x10099a7e 0x10099a81 0x10099a8d 0x10099a94}               /* plaintext  */
INPUT  1 = add(shl(0x10085558,2),0x100848ad)[72:280]                   /* round keys */
OUTPUT 0 = {0x10099d21 0x10099d69 0x10099daf 0x10099df0}               /* ciphertext */
What we can see here is that parameters’ fragments INPUT 1 are not correctly identified by the solution. This is because simplification rules used by our normalization step may merge several instructions together into a single node. This is what happen for the second input parameter. The node in the DFG corresponding to the second input parameter cannot be translated back into an instruction. In such cases we choose to print its mnemonic next to the location of its input operand(s). And so forth.
Using a debugger (in this example Windbg), we can dynamically set the value of the input parameters. Then, once the algorithm has been executed, we can check that we have obtained the right results.
The first thing to do is to compute the location of the second parameter (which is the round key buffer) since our method was not able to locate it directly. We know that it depends on two operands respectively produced at address 0x10085558 and 0x100848ad. Using the debugger, we can determine the value of the two operands.
					$ bp 0x100848ad
$ bp 0x10085558
$ g
Breakpoint 0 hit
100848ad    mov eax,dword ptr [eax+7Ch] ds:0023:005eb10c=005eee08
$ g
Breakpoint 1 hit
10085558    mov ecx,dword ptr [eax+14h] ds:0023:005eee1c=00000000
The first parameter is equal to 0 and the second parameter is equal to 0x005eee08. Thus the location of the round keys buffer is equal to add(shl(0,2),0x005eee08) = 0x005eee08. The [72:280] notation specifies the range of the memory buffer: from offset 72 to offset 280.
Just for the record, here is a dump of the round keys buffer:
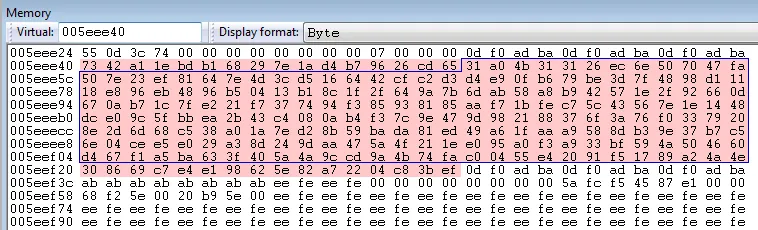
The 13 rounds keys buffer is surrounded by a blue line. It starts at address 0x5eee50 (0x005eee08 + 72) and ends at address 0x5eef20 (0x005eee08 + 280). The full round key buffer is highlighted in light red: it is larger since it contains in addition the first and the last round key. At this point one can verify that this buffer truly has the internal structure of an AES round key buffer (as described in the Cold Boot Attack).
In order to assess the 7-Zip AES implementation, we choose to use the NIST test vector for AES256. From this link, the plaintext parameter must be set to 00102030405060708090a0b0c0d0e0f0 and we expect to get 627bceb9999d5aaac945ecf423f56da5 at the end of the 13th round. Using Windbg, we can set the round key buffer and then we set each fragment of the plaintext at a time:
					$ eb 0x0005eee40 0x00 0x01 0x02 0x03 0x04 0x05 0x06 0x07 0x08 0x09 0x0a 0x0b 0x0c 0x0d 0x0e 0x0f 0x10 0x11 0x12 0x13 0x14 0x15 0x16 0x17 0x18 0x19 0x1a 0x1b 0x1c 0x1d 0x1e 0x1f 0xa5 0x73 0xc2 0x9f 0xa1 0x76 0xc4 0x98 0xa9 0x7f 0xce 0x93 0xa5 0x72 0xc0 0x9c 0x16 0x51 0xa8 0xcd 0x02 0x44 0xbe 0xda 0x1a 0x5d 0xa4 0xc1 0x06 0x40 0xba 0xde 0xae 0x87 0xdf 0xf0 0x0f 0xf1 0x1b 0x68 0xa6 0x8e 0xd5 0xfb 0x03 0xfc 0x15 0x67 0x6d 0xe1 0xf1 0x48 0x6f 0xa5 0x4f 0x92 0x75 0xf8 0xeb 0x53 0x73 0xb8 0x51 0x8d 0xc6 0x56 0x82 0x7f 0xc9 0xa7 0x99 0x17 0x6f 0x29 0x4c 0xec 0x6c 0xd5 0x59 0x8b 0x3d 0xe2 0x3a 0x75 0x52 0x47 0x75 0xe7 0x27 0xbf 0x9e 0xb4 0x54 0x07 0xcf 0x39 0x0b 0xdc 0x90 0x5f 0xc2 0x7b 0x09 0x48 0xad 0x52 0x45 0xa4 0xc1 0x87 0x1c 0x2f 0x45 0xf5 0xa6 0x60 0x17 0xb2 0xd3 0x87 0x30 0x0d 0x4d 0x33 0x64 0x0a 0x82 0x0a 0x7c 0xcf 0xf7 0x1c 0xbe 0xb4 0xfe 0x54 0x13 0xe6 0xbb 0xf0 0xd2 0x61 0xa7 0xdf 0xf0 0x1a 0xfa 0xfe 0xe7 0xa8 0x29 0x79 0xd7 0xa5 0x64 0x4a 0xb3 0xaf 0xe6 0x40 0x25 0x41 0xfe 0x71 0x9b 0xf5 0x00 0x25 0x88 0x13 0xbb 0xd5 0x5a 0x72 0x1c 0x0a 0x4e 0x5a 0x66 0x99 0xa9 0xf2 0x4f 0xe0 0x7e 0x57 0x2b 0xaa 0xcd 0xf8 0xcd 0xea 0x24 0xfc 0x79 0xcc 0xbf 0x09 0x79 0xe9 0x37 0x1a 0xc2 0x3c 0x6d 0x68 0xde 0x36
$ bp 0x10099a7e
$ bp 0x10099a81
$ bp 0x10099a8d
$ bp 0x10099a94
$ g
Breakpoint 0 hit
10099a7e    xor ebx,dword ptr [esi+0Ch]
$ t
Breakpoint 1 hit
10099a81    xor edx,dword ptr [esi+4]
$ r @ebx=0xf0e0d0c0
$ t
$ r @edx=0x70605040
$ g
Breakpoint 2 hit
10099a8d    xor ecx,dword ptr [esi+8]
$ t
$ r @ecx=0xb0a09080
$ g
Breakpoint 3 hit
0x10099a94  xor edi,dword ptr [esi]
$ t
$ r @edi=0x30201000
Once this is done, we execute the algorithm until we reach one of the addresses specified for the location of the output parameter. For each of these address (0x10099d21, 0x10099d69, 0x10099daf and 0x10099df0) we check that the value produced by the designated instruction is correct. Hint: here the values to monitor are always in ebx.
					Breakpoint 4 hit
10099d21    xor ebx,dword ptr [eax+8]
$ t
eax=005eef10 ebx=f4ec45c9 ecx=e486fb14 edx=21259201 esi=95046651 edi=03955343
$ g
Breakpoint 5 hit
10099d69    xor ebx,dword ptr [eax]
$ t
eax=005eef10 ebx=b9ce7b62 ecx=e486fb14 edx=21259201 esi=95046651 edi=03955343
$ g
Breakpoint 6 hit
10099daf    xor ebx,dword ptr [eax+0Ch]
$ t
eax=005eef10 ebx=a56df523 ecx=e486fb14 edx=00002125 esi=95046651 edi=03955343
$ g
Breakpoint 7 hit
10099df0    xor ebx,dword ptr [eax+4]
$ t
eax=005eef10 ebx=aa5a9d99 ecx=000000fb edx=b9ce7b62 esi=f4ec45c9 edi=00000043
So here we are: outputs from NIST test vectors are all found back… Well done 7-Zip, your AES implementation is compliant with the NIST =)
Conclusion
In this article we have presented a practical example of automated reverse engineering of a cryptographic algorithm. We used an automated method relying on DFG isomorphism to successfully identify and locate an AES implementation inside the 7-Zip binary. The first objective was to demonstrate that our solution was able to cope with real life software. The 7-Zip example was especially well suited since the traditional approach based on constant identification gives poor results (FindCrypt2 fails and a manual search only reveals the encryption function). A second objective was to illustrate how one can take advantage of precise parameter location to evaluate the correctness of the implementation by running test vectors.