07/02/2017
Blog technique
Virtualization Based Security – Part 1: The boot process
Adrien Chevalier


Virtualization Based Security
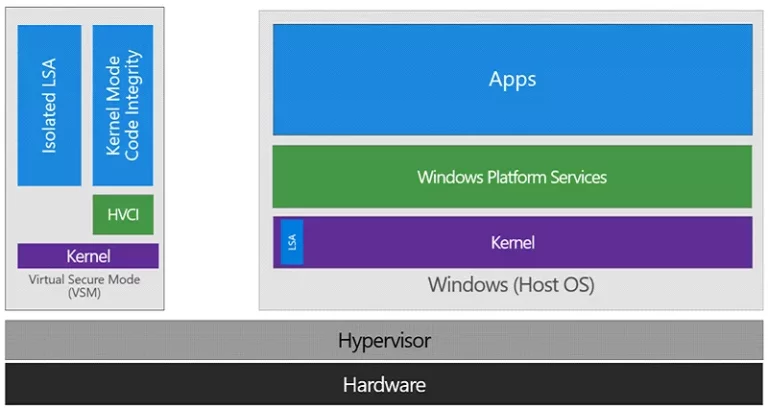
Figure 1: Overview of Virtualization Based Security
The CredentialGuard *security feature leverages this technology in isolating the critical *lsass.exe process in a VTL1 trustlet (lsaiso.exe, “Isolated LSA” in the above picture), making impossible to even the VTL0 kernel to access its memory. Only messages may be forwarded to the isolated process from the VTL0, effectively blocking memory passwords and hashes harvesters such as Mimikatz’.
The *DeviceGuard *security features allows W^X memory mitigation (a physical page cannot be both executable and writable) in the VTL0 kernel address space, and accepts a policy which will contain authorized code signers. If the VTL0 kernel wants to make a physical page executable, it must ask the VTL1 for the change (“HVCI” in the picture), which will check the signature against its policy. For usermode code, this is not enforced yet, and the VTL0 kernel just asks for the signature verification. Policies are loaded during the boot startup, and cannot be modified after, which forces the user to reboot in order to load new policies.
Policies may also be signed: in that case, authorized signers are set in UEFI variables, and new policies will be checked against these signers. UEFI variables have their Setup and Boot flags set, which means they cannot be accessed nor modified after startup. In order to cleanup these variables, the local user must reboot using a custom Microsoft EFI bootloader, which will remove them after user interaction (by pressing a key).
Therefore, VBS heavily relies on SecureBoot: the bootloader’s integrity must be checked, as it is responsible to load the policies, Hyper-V, the VTL1, and so on.
If you are interested in a detailed Device Guard overview, you can read this MSDN article: https://blogs.technet.microsoft.com/ash/2016/03/02/windows-10-device-guard-and-credential-guard-demystified/.
We also encourage you to read/listen Alex Ionescu and Rafal Wojtczuk BlackHat 2015/2016 presentations, which helped us a lot in this work:
- « Battle of SKM and IUM », Alex Ionescu BlackHat 2015 (slides);
- « Battle of SKM and IUM », Alex Ionescu BlackHat 2015 (video);
- « Analysis of the attack surface of windows 10 », Rafal Wojtczuk BlackHat 2016 (slides);
- « Analysis of the attack surface of windows 10 », Rafal Wojtczuk BlackHat 2016 (whitepaper);
- « Analysis of the attack surface of windows 10 », Rafal Wojtczuk BlackHat 2016 (video).
You can also read the two articles of the hvinternals.blogspot.fr blog for more Hyper-V related technical information: * « Hyper-V debugging for beginners » (also covers Hyper-V startup); * « Hyper-V internals ».
In this article, we will cover the system boot process, from the Windows bootloader to the VTL0 startup. In order to analyze how VBS initializes itself during the boot process, the following files of a Windows 10 1607 build have been reverse-engineered:
- bootmgr.efi: the EFI boot loader (a small part of it);
- winload.efi: the EFI Windows loader;
- hvix.exe: the hyper-V (a really tiny of it);
- ntoskrnl.exe: the NTOS kernel;
- securekernel.exe: the secure kernel;
- ci.dll: the VTL0 code integrity;
- skci.dll: the VTL1 code integrity.
So let’s dig into the VBS boot process, starting from the execution of winload.efi to the ntoskrnl.exe entry point execution.
The Boot Process
The boot process can be summarized in these five essential steps:
- *bootmgr.efi *is the first component to be loaded. It is validated by *SecureBoot *and then executed;
- bootmgr.efi loads and checks winload.efi, the main windows loader;
- *winload *loads and checks the VBS configuration;
- *winload *loads and checks Hyper-V and the VTL0/VTL1 kernels components;
- *winload *exits EFI mode, starts Hyper-V.
Bootmgr.efi
When the system boots up, the Bootmgr.efi is the first Microsoft component that is executed. Its integrity and signature have been previously validated by the Secure Boot UEFI code. In order to be able to recognize revoked signatures, the DBX database which contains revoked signatures is checked (at the end of 2016, this database contains 71 blacklisted -and unknown- SHA256 hashes). At the end of the bootmgr.efi *code, the execution is transferred to the *winload.efi entry point: OslpMain/OslMain.
OslpMain first calls OslpPrepareTarget, which is the “core” function of winload.efi: it will initiate the hypervisor, the kernels, and so on. But to begin with, it initiates the VBS configuration with OslSetVsmPolicy.
VBS policy load
OslSetVsmPolicy first checks the VbsPolicyDisabled EFI variable value (of the Microsoft namespace, see below). If set, this variable is cleared (set to 0), meaning that no Credential Guard configuration will be loaded. This EFI variable therefore allows disabling Credential Guard for a single boot only (and can be set through privileged calls from the VTL0 ring3). If it is not present, the configuration is loaded from the SYSTEM registry hive, and a call is performed to BlVsmSetSystemPolicy, which will read and update the VbsPolicyEFI variable if needed. The corresponding value is then stored in the BlVsmpSystemPolicyglobal variable. This EFI variable is set if the UEFI lock is enabled, and cannot be disabled by *winload.efi *(it just does not have the code to remove it, a custom EFI code must be used).
The function OslpPrepareTarget also calls OslpProcessSIPolicy (which is called twice, first directly, then from the function OslInitializeCodeIntegrity). OslpProcessSIPolicy checks the SI policies signatures using three EFI variables “pools”. Each pool contains three EFI variables, the first contains the policy, the second its version, and the third contains the authorized policy update signers. For instance, for the C:\Windows\System32\CodeIntegrity\SIPolicy.p7b, variables are Si, SiPolicyVersion and SiPolicyUpdateSigners. If the “version” and the “update signers” variables are set, the system enforces the SI policy signature: it must be present and correctly signed, otherwise the boot process will fail. The verification itself is performed by the BlSiPolicyIsSignedPolicyRequiredfunction.
The three policies and the associated variables are summed up below:
We did not identify the purpose of the “revokeSiPolicy” and the “skuSiPolicy”, but they seem to be used similarly as the regular “SiPolicy”.
Hyper-V and kernels components load
The execution is then transferred to the OslArchHypervisorSetup function, which is called with an argument corresponding to the step to execute, starting from 0. On the first time, it will initiate Hyper-V (loading hvloader.efi and executing it via HvlpLaunchHvLoader). The Secure Boot settings are then checked by OslInitializeCodeIntegrity.
OslpPrepareTarget then loads the NTOS kernel (ntoskrnl.exe), and use the OslpLoadAllModules function to load the hal.dll and *mcupdate.dll *modules. Their signatures verifications are performed during the load process (in ImgpLoadPEImage and OslLoadImage). “Local Key” and “Identification Key” are then loaded from EFI variables by OslVsmProvisionLKey and OslVsmProvisionIdk functions.
At this moment, the NTOS kernel is initiated but not started. OslVsmSetup is then called with the “0” parameter (same as OslArchHypervisorSetup: it takes a “step” parameter), which will first check that Hyper-V has been started and then initiate the OslVsmLoaderBlock globals (parameters given to the secure kernel during its initialization). Then, OslVsmSetup loads the secure kernel (securekernel.exe) and its dependencies (skci.dll) through the OslpVsmLoadModules function (OslLoadImage is again used to check their signatures). The EFI variable OsLoaderIndications first bit is then set to 1.
Finally, the OslVsmSetupfunction is called again but with the argument “1”. This triggers the initialization of several OslVsmLoaderBlock parameters.
When the function OslpPrepareTarget returns, the VBS parameters have been validated, and both the NTOS and the secure kernels are loaded. Their entry points’ addresses have been stored in the OslpVsmSystemStartup and OslEntryPoint global variables (respectively securekernel.exe and ntoskrnl.exe entry points) for further reuse.
Microsoft EFI variables
The VBS EFI variables (and more generally Microsoft ones) belong to the namespace: {0x77FA9ABD, 0x0359, 0x4D32, 0xBD, 0x60, 0x28, 0xF4, 0xE7, 0x8F,
0x78, 0x4B}. These variables have their “Boot” and “Setup” attributes set, so their access or modification after the EFI boot phase is not permitted.
It is however possible to dump them in order to help the reverser during his analysis. The EFI variables related to VBS and their corresponding usages are summed up below:
ShvlpVtlReturn (VTL0 returns/calls)
In order to dump these variables’ content, it is possible to turn off Secure Boot and to use a simple EFI custom bootloader (gnu-efi and VisualStudio work perfectly). Some variables dumps are given as examples:
Remark: We wrote an (H) when realizing an hypothesis.
Hyper-V and Secure Kernel startups
Back from OslpPrepareTarget, the execution flow has now to start Hyper-V and separate VTL0 and VTL1 spaces. This process can be summarized in the following points:
- *winload *runs in the “first” Hyper-V VM;
- *winload *calls the secure kernel’s entry point (EP);
- *securekernel *initializes itself, asks Hyper-V for its memory protection;
- *securekernel *asks for VTL1 activation;
- Hyper-V enables VTL1 (the “second VM”), returns in
ShvlpVtl1Entry; - *securekernel *(which is now VTL1) returns to *winload *(which is now VTL0) through
ShvlpVtlReturn; - winload *calls *ntoskrnl entry point.
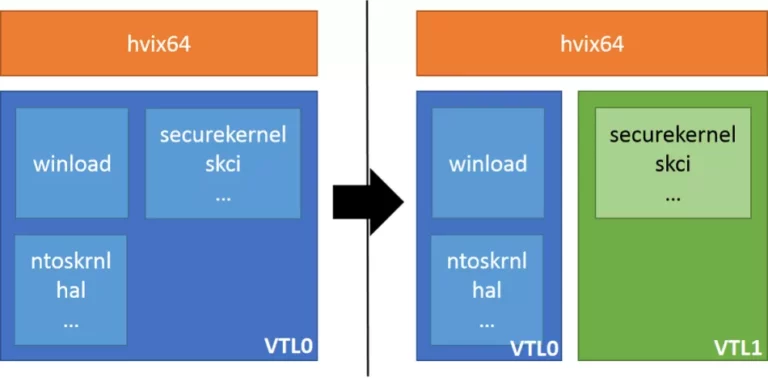
These are the states before and after the initialization of securekernel (the VTL0 VM is the blue block, the VTL1 is the green one, and Hyper-V the orange one):
When following the execution flow, OslpMain exits EFI mode by calling OslFwpKernelSetupPhase1 and starts Hyper-V through OslArchHypervisorSetup with step “1”. Hvix64 is started by saving RSP into the HvlpSavedRsp global and by passing HvlpReturnFromHypervisor to hvix64. When HvlpReturnFromHypervisor is hit, the startup is checked using a cpuid instruction, and RSP is restored. We are actually in the first virtual machine, which will become VTL1 soon.
OslVsmSetup is then called a last time (step “2”) which will:
- check VBS parameters;
- verify that Hyper-V is correctly running;
- modify the
OslVsmLoaderBlocksettings; - copy the
OslVsmLKeyArray(Local Key) andOslVsmIdk(“idk” for “Identification Key”) in the same block; - call the secure kernel entry point which has been stored into the
OslpVsmSystemStartupglobal, specifying theOslVsmLoaderBlockand its size as parameters.
The secure kernel will then perform its initialization, and will more specifically call SkmiProtectSecureKernelPages in order to setup its own memory, but also register Hyper-V events interception routines (HyperGuard and its Skpg* prefixed routines). Operations on the following Model-Specific Register (MSR), according to http://www.sandpile.org/x86/msr.htm are intercepted and handled by the function SkpgxInterceptMsr:
0x1B(APIC_BASE);0x1004(?);0x1005(?);0x1006(?);0x100C(?);0xC0000080(EFER);0xC0000081(STAR);0xC0000082(LSTAR);0xC0000083(CSTAR);0xC0000084(FMASK);0xC0000103(TSC_AUX);0x174(SEP_SEL);0x175(SEP_RSP);0x176(SEP_RIP);0x1a0(MISC_ENABLE).
Our hypothesis is that these handlers are set in order to catch CPL transitions in VTL0 and to block critical MSR modifications. There are also two other routines, SkpgxInterceptRegisters and SkpgInterceptRepHypercall. One possibility is that the first one may be able to intercept CRXXX registers manipulation (CR4 write for SMEP disabling, for instance) and the second one to intercept unauthorized hypercalls (this is however just an hypothesis).
Regarding HyperGuard, it seems that VTL0 integrity checks are performed by SkpgVerifyExtents. This particular function is called by SkpgHyperguardRuntime, which may be scheduled for regular executions (using SkpgSetTimer). Those HyperGuard handlers and callbacks functions are copied in the SkpgContext global (initialized by SkpgAllocateContext and SkpgInitializeContext).
Keep in mind that the previous paragraphs are only assumptions and may be wrong, since we did not spend a lot of time on VTL1 HyperGuard/PatchGuard routines for now.
At the end of its initialization, the secure kernel will finally perform two hypercalls:
0x0F, intoShvlEnableVpVtl, specifying aShvlpVtl1Entryfunction pointer;0x12, intoShvlpVtlCall, which is not used in any other part of the code, and uses its own hypercall trampoline (we will give more details on these hypercall trampolines in the next article).
ShvlpVtl1Entry ends up on SkpPrepareForReturnToNormalMode, and it seems that this process actually makes Hyper-V enabling VTL1 and VTL0, return to ShvlpVtl1Entry, and then returns to *winload.efi *into VTL0 context.
Finally, when back into *winload.efi *main function, it will execute NTOS entry point through OslArchTransferToKernel, which calls its entry point using the OslEntryPoint global.
The next operations are then executed as if Windows were starting in a normal world, except that the NTOS kernel is now aware of VBS-related components such as Device Guard.
Conclusion
Virtualization-based security is a key component of Microsoft’s Windows 10 security features. By covering the VBS’ secure kernel initialization, we hope that this article will give additional resources to reversers that want to dig deeper into these features.
In a second part, we will then cover how kernel communications between VTL0 and VTL1 and how Hyper-V hypercalls actually work.
Disclaimer
These findings have almost all been retrieved by static analysis using IDA Pro. We apologize if they contain mistakes (actually they probably do), and ask the readers to take this “as it is”. Any helpful remark or criticism is welcome, just email us at etudes{at}amossys.fr!