04/03/2015
Blog technique
Design and usage of OpenDTeX DRTM Secure Boot
Frédéric Guihéry

In this article we present the OpenDTeX research project which leverages trusted computing technologies to ensure strong security properties either at boot time or at OS runtime. We focus this article on the Secure Boot component, that relies on the TPM and DRTM technologies, and show its usage in details.
OpenDTeX Project
This research project aims at providing trusted building blocks to ensure strong security properties during the boot chain and to allow secure execution of isolated enclaves on x86 architectures (i.e. the OS cannot have access to the sensitive code). OpenDTeX has been achieved with the help of the French “RAPID” grant process, which targets both civil and defense use cases, through a consortium composed of AMOSSYS, Bertin Technologies and Telecom ParisTech.
This project leverages trusted computing technologies, designed by the TCG (Trusted Computing Group), such as TPM and DRTM, to provide trusted execution of a minimal TCB (Trusted Computing Base). Besides, each building block can display proof of integrity up to the platform user, by implementing the concept of a trusted banner, thus creating a trusted path between the user and the TCB.
The project’s results have been integrated into a Linux-based prototype, as well as in the PolyXene multi-level security operating system.
We also provide an open source implementation of this secure boot, available on github, licensed under the Modified BSD.

Security model
OpenDTeX implements a security model based on a white-list approach, in contrast to common security products that depend on a black list approach (AVs, IDS, …). The security mechanisms rely upon a minimal and verified TCB, which excludes the BIOS in the context of a DRTM.
A strong hypothesis is also considered in the secure enclave’s use case: the user and operating system can be malicious.
The Secure Boot component
The Secure Boot provides integrity measurement of boot chain and local integrity attestation, either implicitly (through unsealing operations) or explicitly (through a secret banner).
An integrity measurement is done at launch time, either through a static chain of trust (called SRTM) or through a dynamic chain of trust (called DRTM). Difference between SRTM and DRTM is that the first one measures all launch time components (BIOS, MBR, the boot loader, initrd, kernel, etc.), in contrast to the second one which measures a minimal environment (the Intel SINIT binary, a Secure Loader, an initrd, the kernel, etc.). The figure below summarizes these two different types of chain of trust.

In that context, OpenDTeX allows sealing of critical components. For instance, the Linux kernel may be unsealed when platform integrity is verified, thus permits local implicit attestation of integrity. If the user wants an explicit attestation of integrity, he can rely on a shared secret (either a text or an image), only known by him and the TCB of the platform. This shared secret is encrypted so that it can be unsealed and shown to the user when the platform integrity is verified.
The Secure Enclave component
Besides the Secure Boot component, OpenDTeX allows execution of sensitive code in a trusted environment, which means isolated from the operating system. This permits execution of critical operations even if the operating system (or the administrator) is untrusted or compromised.
Secure enclave mechanism relies on the DRTM technology and is launched at OS runtime. When the DRTM sequence begins, the operating system is frozen and operations are executed in the secure enclave. Since the OS is frozen, executed operations are protected both in terms of integrity and confidentiality. Moreover, the DRTM process can prevent external DMA tampering using the IOMMU chipset access control. This means the secure enclave cannot be accessed by internal and external devices.
This secure enclave mechanism may be leveraged in different use cases. For example, we can picture such a protection for email writing and signature in a trusted user interface. Other examples would be the transmission of the smart card PIN through a trusted path, the implementation of a virtual smart card/wallet, …
Integrity proofs
Both Secure Boot and Secure Enclave mechanisms are able to provide a proof of integrity up to the local platform user. We list below three examples of how to prove the integrity of a platform.
- Secure banner: this is a shared secret (either a text or an image, only known by the user) sealed by the TPM. This shared secret is shown to the platform user if and only if the platform integrity matches the reference one. When the shared secret is showed to the platform user, a trusted path between the TCB and the user is established. In addition, this secure banner mechanism allows to protect the platform against the well-known Evil maid attack: the user will enter his password only if the known shared secret is displayed.
- Sealing of critical components: when a critical component is sealed, the operation of unsealing will provide an implicit and local attestation of the platform integrity. Indeed, the operation of unsealing is directly related to the platform integrity: the unseal operation cannot succeed if the platform integrity is not verified.
- Integrity attestation with a smartphone: when using a trusted device, we can attest of the platform integrity. A proof of concept using an Android smartphone which plays the “remote” verifier role has been presented at SSTIC’2014 conference.
OpenDTeX developments
As of today, OpenDTeX project includes:
- A TPM 1.2 API library independent from the BIOS or OS,
- A minimal TSS (TCG Software Stack) API library independent from the OS,
- A set of tools to control the TPM,
- An extension of Grub 2 (which implements SRTM),
- An extension of TBoot, with the implementation of our dedicated DRTM MLE,
- An implementation of DRTM at OS runtime (in the Secure Enclave).
Comparison with similar tools
Compared to other tools, OpenDTeX Secure Boot allows both integrity verification and unsealing of boot time components, either in SRTM or DRTM mode. Besides, it provides explicit trust attestation to the user thanks to a shared secret (the secret banner).
- Trusted Grub: this tool permits to extend the trust chain by measuring components that are executed beyond the BIOS, in SRTM mode.
- Trusted Boot: this tool permits to start a new trust chain, in DRTM mode. Is also permits to verify the integrity of the Linux kernel and its associated initrd.
- Bitlocker (in TPM mode): this tools allows to seal the master key with the TPM so that decryption is possible only if the platform integrity is correct. It only works through a SRTM (which means a large TCB).
- Anti-Evil-Maid proof of concept from Joanna Rutkowska, which implements the concept of secure banner. This PoC only supports SRTM.
Design and details of the Secure Boot in DRTM mode
In this section, we describe how we designed the Secure Boot using DRTM. Regarding the DRTM implementation, we rely on the Intel Trusted Boot extension combined with our dedicated MLE (Measured Launch Environment).
In Trusted Boot, the associated MLE is responsible for verifying the integrity of the Linux kernel and its initrd file by comparing their hash to a reference one. In OpenDTeX, our MLE integrates more functionalities (the secure banner, the unsealing of critical components, etc.). Our modified MLE that is responsible for those new functionalities is called TLoader. We describe its architecture and usage in the current chapter, after a brief reminder regarding Trusted Boot.
Design of Trusted Boot
In Trusted Boot, the execution flow is as follow:
- A DRTM sequence is initiated by the
GETSEC[SENTER]instruction from the Intel SMX instruction set. - The processor measures and then executes an Intel-signed binary called
SINIT ACorIntel SINIT, which is responsible for verifying that the platform is properly compatible and configured. - The
SINIT ACmeasures and then executes a component called MLE (Measured Launch Environment), which acts as a secure loader. Trusted Boot provides its own MLE. - The Trusted Boot MLE finally measures the Linux kernel and its associated initrd and verifies that their hashes matches the reference ones. If this is the case, the execution flow is transferred to the Linux kernel.
Description of the TLoader MLE
Our OpenDTeX MLE, called TLoader, provides the following functionalities:
- The capability to extend the DRTM trust chain.
- A secure banner, to allow explicit local attestation of platform integrity to the user.
- The unsealing of files, and especially the Linux kernel and the initrd, thus allowing to conditionaly boot the platform if its integrity is verified.
The OpenDTeX TLoader currently supports the following commands, received through multi-boot structure of Grub:
- tpm_loadkey: loads a cryptographic key in the TPM volatile memory.
- tpm_banner: unseals a secure banner (either a text or an image) and displays it.
- launch: loads a kernel in memory, measures its integrity and extends the result to a specific TPM PCR register.
- initrd: loads an initrd file in memory, measures its integrity and extends the result to a specific TPM PCR register.
- tpm_launch: loads an encrypted kernel in memory, unseals it, measures its integrity and extends the result to a specific TPM PCR register.
- tpm_initrd: loads an encrypted initrd file in memory, unseals it, measures its integrity and extends the result to a specific TPM PCR register.
- logging: specifies the logging verbosity level.
Use case details: the Secure Banner
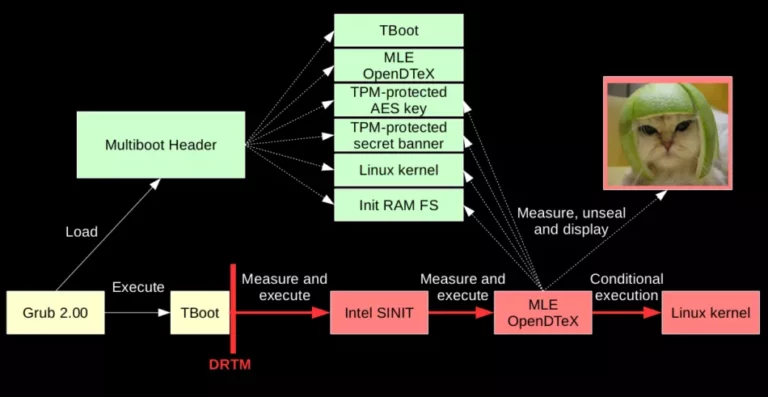
As mentioned above, the secure banner principle intends to provide an explicit local attestation of the platform integrity to the user. The secure banner is in fact a message or an image only known by the user, which is encrypted with a TPM cryptographic key. This secret banner can only be decrypted if the platform integrity is what is expected by the user. Thus, the banner have to be sealed in order to validate the integrity of the plateform. In other words: if the secure banner can be unsealed at boot time, this means that the platform integrity is verified.
The following figure depicts the secure boot scenario in DRTM mode:
Preparation of the Secure Banner
In order to configure and use the Secure Boot component, you’ll need the following specific hardware:
- A TPM 1.2 (Trusted Platform Module).
- A chipset that supports Intel TXT and IOMMU.
- A processor that supports Intel TXT (through the SMX instruction set) and VT-x.
Basically, a platform that have an Intel VPro sticker should be compatible. Besides those hardware requirements, TPM and TXT have to be activated in the BIOS.
Regarding the compilation and preparation of the environment, we encourage you to read the OpenDTeX README page on Github.
Next step is to create a TPM key. The following command creates a TPM key that can only be loaded inside the TPM memory only if the PCR1 and PCR2 TPM registers have the same content that they had during key creation. We also configure the TPM key so that it can be loaded without any password (-z option).
					$ cd tools/
$ make
$ tcg_createkey -z 1 key1.key PCR1:PCR2
Using that key, you can seal a secret text message. The following command tells the TPM to seal the object so that it can be decrypted only if contents of PCR17, PCR18 and PCR19 have not changed:
					$ echo "My secret message" > /tmp/test
$ python createStruct.py text /tmp/test > /tmp/test.data
$ ./tcg_seal -i /tmp/test.data -o data.seal -z -k key1.key -p 17:18:19
(0000)-> SRK(WellKnown : 1)
(0001)-> key1.key(WellKnown : 1)(00000000)
| child of SRK
symmetric key : b0 49 e5 34 9b f1 c5 59 d3 b5 82 03 58 68 9f a2 f1 ad e4 d3 1c dd 18 bb 01
You can also seal a secret image:
					$ python createStruct.py image zoby.bmp > /tmp/test.data
$ ./tcg_seal -i /tmp/test.data -o data.seal -z -k key1.key
Once the data is sealed (either the message or the image), copy it to the boot directory:
					$ sudo mkdir /boot/opendtex/
$ sudo cp data.seal /boot/opendtex/data.seal
Configuration of Grub
Here is an example of a Grub 2 configuration file. It can be used to launch the DRTM through Trusted Boot. Once inside the DRTM, the MLE TLoader is executed and proccesses the unsealing of the secure banner before launching the operating system.
					menuentry 'TBoot+TLoader' {
  # GRUB2 modules
  insmod gzio
  insmod part_msdos
  insmod ext2
  # To find system disk boot partition
  set root='(/dev/sda,msdos5)'
  search --no-floppy --fs-uuid --set=root 86cf0374-fbf3-4d36-9b5c-45303f24c17a

  # TrustedBoot main module to start
  multiboot /boot/tboot.gz /boot/tboot.gz logging=vga,memory,serial

  # The platform specific AC module
  module /boot/SINIT

  # TLoader module launched by TrustedBoot
  module /boot/tloader.gz /boot/tloader.gz logging=vga

  # Entry to display the secure banner (with a key to load)
  module /boot/opendtex/key1.key /boot/opendtex/key1.key tpm_loadkey aliasKey1 aliasSRK
  module /boot/opendtex/data.seal /boot/opendtex/data.seal tpm_banner aliasKey1

  # The OS image to start
  module /boot/vmlinuz /boot/vmlinuz kdb=fr vga=791 root=/dev/hda1 ...
  module /boot/initrd /boot/initrd
}
Results
Now that the platform is correctly configured, the next time you start the system, a Secure Boot will be launched, meaning that all boot components will be measured. If you have configured your TPM key to be also protected by a password, you will be asked for it (as shown on the figure below). This allows a kind of bidirectional authentication: you type your password to prove your identity, and then the laptop unseals and shows the secure banner to prove its integrity.
If nothing has changed in terms of integrity, you will see the secure banner (image or text).
Once the Linux system has started, you can consult the content of the TPM PCR registers with the following command:
					$ ./tools/tcg_readpcr
  PCR[00] : 838681fbf2e1d9de2372cdeb371dcebf43cb72d5
  PCR[01] : 3a3f780f11a4b49969fcaa80cd6e3957c33b2275
  PCR[02] : 5385babe9a148fca7c71ff29e30dcde38e25acd5
  PCR[03] : 3a3f780f11a4b49969fcaa80cd6e3957c33b2275
  PCR[04] : a8bbdac0edf78fefe73062bd7b81e03b59fede06
  PCR[05] : 8ec59d7bb4b31050958fe3f73b77978bc69fd590
  PCR[06] : 3a3f780f11a4b49969fcaa80cd6e3957c33b2275
  PCR[07] : 3a3f780f11a4b49969fcaa80cd6e3957c33b2275
  PCR[08] : 3413659ca373a0103beec40cf4a1d9102f337a6f
  PCR[09] : 294d55408a1835d2086547aa8872c2e529de7869
  PCR[10] : 5344c494cf057c73ebe70176d5e16749c7b78501
  PCR[11] : 0000000000000000000000000000000000000000
  PCR[12] : 0000000000000000000000000000000000000000
  PCR[13] : 0000000000000000000000000000000000000000
  PCR[14] : 0000000000000000000000000000000000000000
  PCR[15] : 0000000000000000000000000000000000000000
  PCR[16] : 0000000000000000000000000000000000000000
  PCR[17] : 7d068a844f835422a6e3afecdbee5ecc7fac47e1
  PCR[18] : 7fa2a3bc8837f71da12bf9674980583058fe4428
  PCR[19] : e73062bd7b81e03b59fede06a8bbdac0edf78fef
  PCR[20] : 0000000000000000000000000000000000000000
  PCR[21] : ce44563f1063988b78920d57e8d521187a73f69e
  PCR[22] : 46aa769091d29022a13fef3797e380ff22f87804
  PCR[23] : 0000000000000000000000000000000000000000
If a boot component appears to have its integrity altered, you will get an error message from the TPM (see figure below). This error is triggered because the unseal operation has not succeeded. In such an event, the user should have the opportunity to boot in a recovery mode, to reinstall its computer (or just to throw it to the trash).
Conclusion
With the OpenDTeX Secure Boot, we provide a building block aiming at ensuring strong security properties during the boot chain. Those security properties leverages trusted computing technologies, such as TPM and DRTM, that are more and more prevalent in today’s computers.
We strongly believe in the security model behind those technologies, which follows a whitelist approach, and incite system administrators and IT architects to give more concern to it.
Regarding the implementation, if you have a compatible hardware, we encourage you to test this prototype and give us any feedbacks. An SRTM version of this secure boot should be also available in few weeks. This SRTM version would be compatible with more platforms, as there are less hardware requirements (only a TPM 1.2 is mandatory). Nevertheless, the DRTM mode allows a better protection of the TCB, and thus would fit better in critical use cases.
Last but not least, you are very welcome to contribute to this project. We, at AMOSSYS, are also available if you want to talk about anything related to Trusted Computing and similar domains. Feel free to contact us at etudes@amossys.fr.